Terraform (Part 2) : First Deploy

In the first part of this series ,Terraform (Part 1) : Intro, I explained the concept behind Terraform (Infrastructure as code). In this part we will get our hands dirty and deploy our first simple infrastructure. Since we will be focusing on Terraform and not on cloud service providers, I decided to use a simple to understand, yet feature rich cloud service provider, DigitalOcean. More on creating an account later.
What we will be building
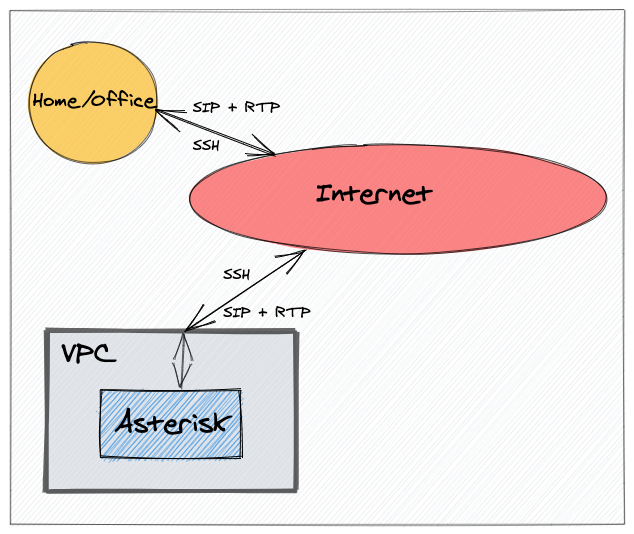
We will be creating an Asterisk server in DigitalOcean with the following requirements:
- The location of the server for this demo will be London.
- Firewall rules to restrict inbound traffic to the server from our home/office public IP address only, allowing
- SSH access (port 22 TCP).
- SIP access (port 5060 UDP).
- RTP/media access (port range 20000 - 50000).
- Outbound traffic from the server will be unrestricted.
- Create a Debian virtual machine with 1GB of RAM and 1vCPU.
- Install Asterisk.
This will be our checklist later whilst building.
1. Installation
The latest version of Terraform can easily be installed by downloading, unzipping and running a compiled binary for your system available here. You can also find instructions in the link to install Terraform using packages.
Linux 64-bit
cd /tmp
wget https://releases.hashicorp.com/terraform/0.14.7/terraform_0.14.7_linux_amd64.zip
unzip terraform_0.14.7_linux_amd64.zip
sudo cp terraform /usr/local/bin
macOS
The binary installation for macOS is similar to that of Linux
cd /tmp
wget https://releases.hashicorp.com/terraform/0.14.7/terraform_0.14.7_darwin_amd64.zip
unzip terraform_0.14.7_linux_amd64.zip
sudo cp terraform /usr/local/bin
Or you can use Brew. First install the HashiCorp tap.
brew tap hashicorp/tap
Then install Terraform
brew install hashicorp/tap/terraform
2. DigitalOcean access
If you want to follow along but do not already have a DigitalOcean account, you can use my affiliate link to create an account and get some free credits to test with ( $100 worth of free credits valid for 60 days).
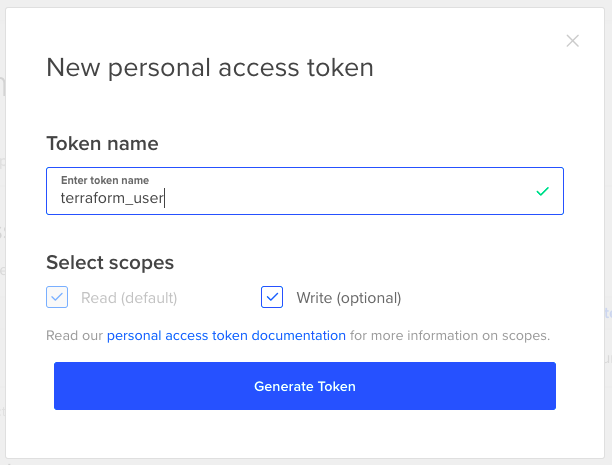
As explained in Part 1, we need to give Terraform API access to our account to be able to build out the infrastructure. For that you need to …
- Log into your DigitalOcean account and go to “API -> Tokens/Keys” and click on “Generate New Token”. Give the token a name and make sure to give “Write” access as well. Once you click “Generate Token” the generated API key will be displayed only once so be sure to copy and save it somewhere secure.
3. SSH Access
It is possible to install an SSH key onto a newly built server so you can later connect to it if you need to.
Let’s create an SSH key called terraform-user without a passphrase, and upload it into our DigitalOcean account. In the terminal run ssh-keygen and follow the steps.
% ssh-keygen
Generating public/private rsa key pair.
Enter file in which to save the key (/Users/kwancro/.ssh/id_rsa): /PATH_TO_KEY/terraform-user
Enter passphrase (empty for no passphrase):
Enter same passphrase again:
Your identification has been saved in /PATH_TO_KEY/terraform-user.
Your public key has been saved in /PATH_TO_KEY/terraform-user.pub.
The key fingerprint is:
SHA256:4QZvuqJOvIZW39ClTmlZJcCMhT3nfpEB3KAYAaUXTW0 kwancro@ivan-mac.lan
The key's randomart image is:
+---[RSA 3072]----+
|   .o=@++o+      |
|    .o+*.E +     |
|   . o..* o o    |
|    .  + = o     |
|      . S   .    |
| . . . @ . .     |
| .+ . B   .      |
|.o.... +         |
|.o+. ..          |
+----[SHA256]-----+
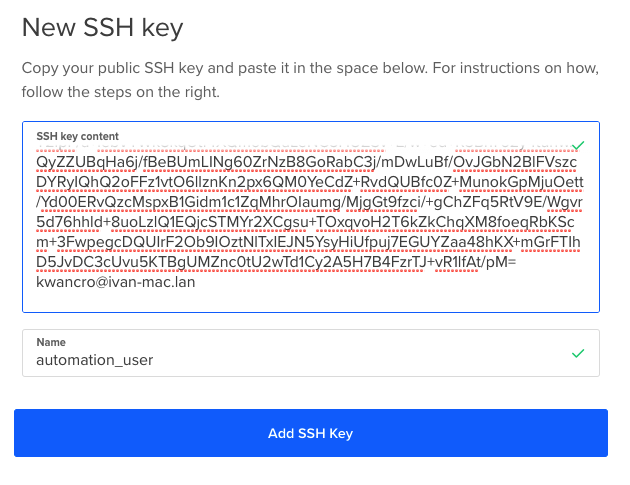
To upload the public key into DigitalOcean, log into your account, go to “Settings -> Security -> SSH Keys (Add SSH Key)”. Then, copy and paste the public key. To copy on a Mac
% cat /PATH_TO_KEY/terraform-user.pub | pbcopy
On Linux,
% cat /PATH_TO_KEY/terraform-user.pub
and paste it in.
With the API token and SSH key sorted, we can finally now look at the script.
4. Script
Terraform needs to know what service provider it is connecting to so that it can download and initialize the appropriate plugins. Terraform calls such a service provider ‘provider’. The long list of providers Terraform supports can be found here.
Each provider has a list of resources that can be created. These resources for example could be virtual machines, databases, storage and firewalls. The latest version of the DigitalOcean provider at the time of writing is 2.6.0 and the documentation for it can be found here.
For simplicity, we will just use one configuration file for our first deployment. In part 3 of this series, I will discuss the benefit of splitting up the configuration into multiple files. Terraform uses YAML for its configuration file format. To start, create a file called main.tf.
4.1 Provider
The provider configuration consists of telling Terraform which provider we are using and where to download the plugin from. Also we need to provide the API key for access to our account.
There are two ways of providing the API token, directly in the script which is not advisable, or as an environmental variable. If the token is not provided in the script, Terraform will search for either of these two environmental variables, DIGITALOCEAN_TOKEN or DIGITALOCEAN_ACCESS_TOKEN. To set the variable in Linux
export DIGITALOCEAN_TOKEN=YOUR_API_TOKEN
For the security conscious, putting a single space at the beginning of the command prevents it from being written to your command history 😉. The provider configuration will look like this:
#===========================================================================
# Provider
#===========================================================================
terraform {
  required_providers {
    digitalocean = {
      source = "digitalocean/digitalocean"
      version = "2.6.0"
    }
  }
}

provider "digitalocean" {
  #token = "API_TOKEN" JUST ILLUSTRATING WHERE THE TOKEN WOULD GO
}
4.2 Tag
DigitalOcean has a simple but powerful concept of tagging. For example you can tag various servers and then reference all of them just by referencing the tag. The resource we are going to create is a tag. To do that we will be using the ‘digitalocean_tag’ resource
#===========================================================================
# Tags
#===========================================================================

resource "digitalocean_tag" "aster" {
  name = "aster"
}
4.3 Variables
From our checklist above, inbound traffic to the Asterisk server is only allowed from our home/office. Also the type of traffic allowed is SSH, SIP and RTP. Looks like we would be needing our IP address in at least 3 rules. The Terraform language supports variables so lets create a variable for our home/office IP address. This way when it changes we only have one place where to update it. To find your public IP address you can visit ip.kwancro.com. This simple service I am running just returns your IP address. In the terminal on Linux/macOS you can use curl:
curl ip.kwancro.com
Once we are creating variables, how about we add our SSH public key as a variable as well. It will come in handy later. We will be using the SSH key fingerprint to identify the uploaded SSH key we want to use. The fingerprint can be found at “Settings -> Security -> SSH Keys”

Terraform supports multiple variable types but the ones we will be using are strings and a list of strings.
#===========================================================================
# Variables
#===========================================================================

variable "SSH_FINGERPRINT" {
  type        = string
  description = "Your SSH key fingerprint"
  default     = "SSH_FINGERPRINT_FOR_USER_GOES_HERE"
}

variable "ALLOWED_USERS" {
  type        = list(string)
  default     = ["xxx.xxx.xxx.xxx/32"]
  description = "Public IPs of safe users"
}
Substitute xxx.xxx.xxx.xxx with your public IP.
4.4 Firewall
Again referring to our checklist above, we have to allow
- Inbound SSH access (port 22 TCP) from home/office
- Inbound SIP access (port 5060 UDP) from home/office
- Inbound RTP/media access (port range 20000 - 50000) from home/office
- Outbound traffic from the server will be unrestricted.
The resource we will be using is ‘digitalocean_firewall’ . From the previous section, the variable ALLOWED_USERS contains our home/office IP address. If we create the firewall so that it applies to the tag ‘aster’, it would mean that any virtual machine (droplet in the DigitalOcean world) we create and assign the tag ‘aster’ to will automatically have these firewall rules assigned to it, simple 😎
In order to reference the tag, we reference the resource, the name and the id resulting in digitalocean_tag.aster.id. Just using the tag name will also work but it is better to reference it so that if/when you want to make changes, again, you do it at one place.
#===========================================================================
# Security Groups
#===========================================================================

resource "digitalocean_firewall" "aster" {
  name = "asterisk-servers"

  tags = [digitalocean_tag.aster.id]

  inbound_rule {
    protocol         = "tcp"
    port_range       = "22"
    source_addresses = var.ALLOWED_USERS
  }

  inbound_rule {
    protocol         = "udp"
    port_range       = "5060"
    source_addresses = var.ALLOWED_USERS
  }

  inbound_rule {
    protocol         = "udp"
    port_range       = "20000-50000"
    source_addresses = var.ALLOWED_USERS
  }
  outbound_rule {
    protocol              = "tcp"
    port_range            = "1-65535"
    destination_addresses = ["0.0.0.0/0", "::/0"]
  }

  outbound_rule {
    protocol              = "udp"
    port_range            = "1-65535"
    destination_addresses = ["0.0.0.0/0", "::/0"]
  }

}
4.5 Droplet
We will be creating a small (1 CPU, 1GB RAM s-1vcpu-1gb) server using a Debian image (debian-10-x64) in DigitalOcean’s London region (lon1). The resource for this is digitalocean_droplet . To gain access to the server after installation we will install the SSH public key we uploaded to DigitalOcean to our newly created server.
As I mentioned in Part 1, it is possible to have Terraform run a script when it is booting up a server. Any bash script we pass as user_data at initial boot time will be run. We can leverage this and install Asterisk.
#===========================================================================
# Droplets
#===========================================================================

resource "digitalocean_droplet" "aster" {
  image  = "debian-10-x64"
  name   = "aster-server-1"
  region = "lon1"
  size   = "s-1vcpu-1gb"
  private_networking = true
  ssh_keys = [var.SSH_FINGERPRINT]
  tags = [digitalocean_tag.aster.id]
  user_data = <<-EOF
                #!/usr/bin/bash
                apt update && apt install asterisk -y
                EOF
}
4.6 Output
It would be good to have Terraform print out the public IP address of the server we create without us having to log into our DigitalOcean account. We can get the IP address by referencing the ipv4_address attribute of the digitalocean_droplet resource used to create the droplet.
#===========================================================================
# Output
#===========================================================================

output "aster-server-1_IP" {
  value=digitalocean_droplet.aster.ipv4_address
}
4.7 Final script
When we combine all the previous sections together we get our final script :
#===========================================================================
# Provider
#===========================================================================
terraform {
  required_providers {
    digitalocean = {
      source = "digitalocean/digitalocean"
      version = "2.6.0"
    }
  }
}

provider "digitalocean" {
  #token = "API_TOKEN" JUST ILLUSTRATING WHERE THE TOKEN WOULD GO
}
#===========================================================================
# Tags
#===========================================================================

resource "digitalocean_tag" "aster" {
  name = "aster"
}

#===========================================================================
# Variables
#===========================================================================

variable "SSH_FINGERPRINT" {
  type        = string
  description = "Your SSH key fingerprint"
  default     = "SSH_FINGERPRINT_FOR_USER_GOES_HERE"
}

variable "ALLOWED_USERS" {
  type        = list(string)
  default     = ["xxx.xxx.xxx.xxx/32"]
  description = "Public IPs of safe users"
}

#===========================================================================
# Security Groups
#===========================================================================

resource "digitalocean_firewall" "aster" {
  name = "asterisk-servers"

  tags = [digitalocean_tag.aster.id]

  inbound_rule {
    protocol         = "tcp"
    port_range       = "22"
    source_addresses = var.ALLOWED_USERS
  }

  inbound_rule {
    protocol         = "udp"
    port_range       = "5060"
    source_addresses = var.ALLOWED_USERS
  }

  inbound_rule {
    protocol         = "udp"
    port_range       = "20000-50000"
    source_addresses = var.ALLOWED_USERS
  }
  outbound_rule {
    protocol              = "tcp"
    port_range            = "1-65535"
    destination_addresses = ["0.0.0.0/0", "::/0"]
  }

  outbound_rule {
    protocol              = "udp"
    port_range            = "1-65535"
    destination_addresses = ["0.0.0.0/0", "::/0"]
  }

}

#===========================================================================
# Droplets
#===========================================================================

resource "digitalocean_droplet" "aster" {
  image  = "debian-10-x64"
  name   = "aster-server-1"
  region = "lon1"
  size   = "s-1vcpu-1gb"
  private_networking = true
  ssh_keys = [var.SSH_FINGERPRINT]
  tags = [digitalocean_tag.aster.id]
  user_data = <<-EOF
                #!/usr/bin/bash
                apt update && apt install asterisk -y
                EOF
}

#===========================================================================
# Output
#===========================================================================

output "aster-server-1_IP" {
  value=digitalocean_droplet.aster.ipv4_address
}
5. Deploying
Now it is time to deploy. First we will go to the folder where we created main.tf and initialize the folder. Then we will have Terraform plan out our configuration, if we are happy with what will be created/changed then we deploy. Lets continue step by step.
5.1 Init
The terraform binary we downloaded does not contain the plugins for all the providers. The init command scans the config file, detects the provider we want to use and then downloads the necessary code for that provider.
Go into the folder containing the configuration file main.tf and run terraform init :
% terraform init

Initializing the backend...

Initializing provider plugins...
- Finding digitalocean/digitalocean versions matching "2.6.0"...
- Installing digitalocean/digitalocean v2.6.0...
- Installed digitalocean/digitalocean v2.6.0 (signed by a HashiCorp partner, key ID F82037E524B9C0E8)

Partner and community providers are signed by their developers.
If you'd like to know more about provider signing, you can read about it here:
https://www.terraform.io/docs/cli/plugins/signing.html

Terraform has created a lock file .terraform.lock.hcl to record the provider
selections it made above. Include this file in your version control repository
so that Terraform can guarantee to make the same selections by default when
you run "terraform init" in the future.

Terraform has been successfully initialized!
5.2 Plan
Now Terraform has downloaded the code for our provider DigitalOcean, let’s have Terraform go through our config and tell us what it plans doing. Before we run the command let’s just quickly recall what we want to do. We want to:
- Create a tag aster
- Create firewall rules and assign to resources tagged aster
- Create a server, tag it aster and install asterisk
Now let’s run the command terraform plan
% terraform plan

An execution plan has been generated and is shown below.
Resource actions are indicated with the following symbols:
  + create

Terraform will perform the following actions:

  # digitalocean_droplet.aster will be created
  + resource "digitalocean_droplet" "aster" {
      + backups              = false
      + created_at           = (known after apply)
      + disk                 = (known after apply)
      + id                   = (known after apply)
      + image                = "debian-10-x64"
      + ipv4_address         = (known after apply)
      + ipv4_address_private = (known after apply)
      + ipv6                 = false
      + ipv6_address         = (known after apply)
      + locked               = (known after apply)
      + memory               = (known after apply)
      + monitoring           = false
      + name                 = "aster-server-1"
      + price_hourly         = (known after apply)
      + price_monthly        = (known after apply)
      + private_networking   = true
      + region               = "lon1"
      + resize_disk          = true
      + size                 = "s-1vcpu-1gb"
      + ssh_keys             = [
          + "SSH_FINGERPRINT_FOR_USER_GOES_HERE",
        ]
      + status               = (known after apply)
      + tags                 = (known after apply)
      + urn                  = (known after apply)
      + user_data            = "8925ac97825fe7a71cd3a79d9e5f9fccba7105e4"
      + vcpus                = (known after apply)
      + volume_ids           = (known after apply)
      + vpc_uuid             = (known after apply)
    }

  # digitalocean_firewall.aster will be created
  + resource "digitalocean_firewall" "aster" {
      + created_at      = (known after apply)
      + id              = (known after apply)
      + name            = "asterisk-servers"
      + pending_changes = (known after apply)
      + status          = (known after apply)
      + tags            = (known after apply)

      + inbound_rule {
          + port_range                = "20000-50000"
          + protocol                  = "udp"
          + source_addresses          = [
              + "xxx.xxx.xxx.xxx/32",
            ]
          + source_droplet_ids        = []
          + source_load_balancer_uids = []
          + source_tags               = []
        }
      + inbound_rule {
          + port_range                = "22"
          + protocol                  = "tcp"
          + source_addresses          = [
              + "xxx.xxx.xxx.xxx/32",
            ]
          + source_droplet_ids        = []
          + source_load_balancer_uids = []
          + source_tags               = []
        }
      + inbound_rule {
          + port_range                = "5060"
          + protocol                  = "udp"
          + source_addresses          = [
              + "xxx.xxx.xxx.xxx/32",
            ]
          + source_droplet_ids        = []
          + source_load_balancer_uids = []
          + source_tags               = []
        }

      + outbound_rule {
          + destination_addresses          = [
              + "0.0.0.0/0",
              + "::/0",
            ]
          + destination_droplet_ids        = []
          + destination_load_balancer_uids = []
          + destination_tags               = []
          + port_range                     = "1-65535"
          + protocol                       = "tcp"
        }
      + outbound_rule {
          + destination_addresses          = [
              + "0.0.0.0/0",
              + "::/0",
            ]
          + destination_droplet_ids        = []
          + destination_load_balancer_uids = []
          + destination_tags               = []
          + port_range                     = "1-65535"
          + protocol                       = "udp"
        }
    }

  # digitalocean_tag.aster will be created
  + resource "digitalocean_tag" "aster" {
      + databases_count        = (known after apply)
      + droplets_count         = (known after apply)
      + id                     = (known after apply)
      + images_count           = (known after apply)
      + name                   = "aster"
      + total_resource_count   = (known after apply)
      + volume_snapshots_count = (known after apply)
      + volumes_count          = (known after apply)
    }

Plan: 3 to add, 0 to change, 0 to destroy.

Changes to Outputs:
  + aster-server-1_IP = (known after apply)

------------------------------------------------------------------------

Note: You didn't specify an "-out" parameter to save this plan, so Terraform
can't guarantee that exactly these actions will be performed if
"terraform apply" is subsequently run.
The + sign indicates what is going to be added and the summary line :
Plan: 3 to add, 0 to change, 0 to destroy.
tells us that 3 resources will be created, just as we wanted. Perfect! Now let’s apply it
5.3 Apply
Now that we have checked and are happy with the changes Terraform will be making, we can run terraform apply
% terraform apply

An execution plan has been generated and is shown below.
Resource actions are indicated with the following symbols:
  + create

Terraform will perform the following actions:

  # digitalocean_droplet.aster will be created
...
...
...
You will notice that the output is basically the same as that from terraform plan with the only difference being the end:
Do you want to perform these actions?
  Terraform will perform the actions described above.
  Only 'yes' will be accepted to approve.

  Enter a value:
Typing in yes will initiate the build. This is the moment we have been waiting for! Type in yes. Terraform should start working it’s magic and in the end you should see
Apply complete! Resources: 3 added, 0 changed, 0 destroyed.

Outputs:

aster-server-1_IP = "138.68.163.245"
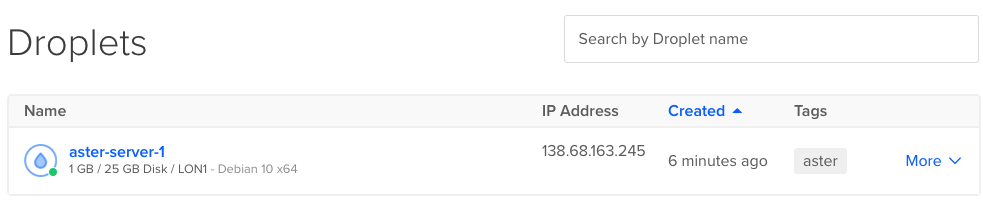
6. Confirm
If we log into our DigitalOcean account and look under droplets we should see our newly created droplet with the same public IP as the one outputted after applying the config.
Our firewall (Networking ->Firewalls) should also be updated with a new list with 5 rules called asterisk-servers.

Let’s use the popular SIP tool sipsakto send SIP OPTIONS pings to our newly installed Asterisk server and see if we will get a response.
% sipsak -v -s sip:s@138.68.163.245
address: 4121117834, rport: 0, username: 's', domain: '138.68.163.245'
DEBUG:
using connected socket for sending
SIP/2.0 200 OK
Via: SIP/2.0/UDP 192.168.86.22:60547;branch=z9hG4bK.6a0b047c;alias;received=37.228.224.196;rport=17454
From: sip:sipsak@192.168.86.22:60547;tag=2f85dbe2
To: sip:s@138.68.163.245;tag=as4f58af54
Call-ID: 797301730@192.168.86.22
CSeq: 1 OPTIONS
Server: Asterisk PBX 16.2.1~dfsg-1+deb10u2
Allow: INVITE, ACK, CANCEL, OPTIONS, BYE, REFER, SUBSCRIBE, NOTIFY, INFO, PUBLISH, MESSAGE
Supported: replaces, timer
Contact: <sip:138.68.163.245:5060>
Accept: application/sdp
Content-Length: 0
Yes we do 👍
You can also try SSH-ing to the Asterisk server as the user root using the key you generated.
7. Updates
For example if our public IP address changes and we want to update the firewall rules, in our example we would just update the variable ALLOWED_USERS with the new IP address and run terraform plan then terraform apply . Technically it is not necessary to do a plan before apply but it is a good habit. It allows you to safely review the changes.
After running terraform plan you will notice that the execution plan summary indicating that only one resource ,digitalocean_firewall, will be changed. - indicates what will be removed whilst + shows what will be added.
% terraform plan
digitalocean_tag.aster: Refreshing state... [id=aster]
digitalocean_droplet.aster: Refreshing state... [id=237674003]
digitalocean_firewall.aster: Refreshing state... [id=425aade0-2a73-492d-a389-3c45114c90f8]

An execution plan has been generated and is shown below.
Resource actions are indicated with the following symbols:
  ~ update in-place

Terraform will perform the following actions:

  # digitalocean_firewall.aster will be updated in-place
  ~ resource "digitalocean_firewall" "aster" {
        id              = "425aade0-2a73-492d-a389-3c45114c90f8"
        name            = "asterisk-servers"
        tags            = [
            "aster",
        ]
        # (4 unchanged attributes hidden)

      - inbound_rule {
          - port_range                = "20000-50000" -> null
          - protocol                  = "udp" -> null
          - source_addresses          = [
              - "37.228.224.196/32",
            ] -> null
          - source_droplet_ids        = [] -> null
          - source_load_balancer_uids = [] -> null
          - source_tags               = [] -> null
        }
      + inbound_rule {
          + port_range                = "20000-50000"
          + protocol                  = "udp"
          + source_addresses          = [
              + "45.200.224.5/32",
            ]
          + source_droplet_ids        = []
          + source_load_balancer_uids = []
          + source_tags               = []
        }
      - inbound_rule {
          - port_range                = "22" -> null
          - protocol                  = "tcp" -> null
          - source_addresses          = [
              - "37.228.224.196/32",
            ] -> null
          - source_droplet_ids        = [] -> null
          - source_load_balancer_uids = [] -> null
          - source_tags               = [] -> null
        }
      + inbound_rule {
          + port_range                = "22"
          + protocol                  = "tcp"
          + source_addresses          = [
              + "45.200.224.5/32",
            ]
          + source_droplet_ids        = []
          + source_load_balancer_uids = []
          + source_tags               = []
        }
      - inbound_rule {
          - port_range                = "5060" -> null
          - protocol                  = "udp" -> null
          - source_addresses          = [
              - "37.228.224.196/32",
            ] -> null
          - source_droplet_ids        = [] -> null
          - source_load_balancer_uids = [] -> null
          - source_tags               = [] -> null
        }
      + inbound_rule {
          + port_range                = "5060"
          + protocol                  = "udp"
          + source_addresses          = [
              + "45.200.224.5/32",
            ]
          + source_droplet_ids        = []
          + source_load_balancer_uids = []
          + source_tags               = []
        }

        # (2 unchanged blocks hidden)
    }

Plan: 0 to add, 1 to change, 0 to destroy.

------------------------------------------------------------------------

Note: You didn't specify an "-out" parameter to save this plan, so Terraform
can't guarantee that exactly these actions will be performed if
"terraform apply" is subsequently run.
Running terraform apply and confirming with yes will execute the change.
8. Destroy
terraform destroy will delete everything we just built. Terraform of course asks for confirmation before proceeding.
% terraform destroy

An execution plan has been generated and is shown below.
Resource actions are indicated with the following symbols:
  - destroy

Terraform will perform the following actions:

  # digitalocean_droplet.aster will be destroyed
  - resource "digitalocean_droplet" "aster" {
      - backups              = false -> null
      - created_at           = "2021-03-19T18:58:25Z" -> null
      - disk                 = 25 -> null
      - id                   = "237674003" -> null
      - image                = "debian-10-x64" -> null
      - ipv4_address         = "138.68.163.245" -> null
      - ipv4_address_private = "10.106.0.2" -> null
      - ipv6                 = false -> null
      - locked               = false -> null
      - memory               = 1024 -> null
      - monitoring           = false -> null
      - name                 = "aster-server-1" -> null
      - price_hourly         = 0.00744 -> null
      - price_monthly        = 5 -> null
      - private_networking   = true -> null
      - region               = "lon1" -> null
      - resize_disk          = true -> null
      - size                 = "s-1vcpu-1gb" -> null
      - ssh_keys             = [
          - "04:be:a6:18:89:d5:6f:f6:2a:9c:fb:b5:26:5f:25:55",
        ] -> null
      - status               = "active" -> null
      - tags                 = [
          - "aster",
        ] -> null
      - urn                  = "do:Droplet:237674003" -> null
      - user_data            = "8925ac97825fe7a71cd3a79d9e5f9fccba7105e4" -> null
      - vcpus                = 1 -> null
      - volume_ids           = [] -> null
      - vpc_uuid             = "5ef74e37-d7d7-4cec-9bfa-4213fc43d6b6" -> null
    }
...
...
...


Plan: 0 to add, 0 to change, 3 to destroy.

Changes to Outputs:
  - aster-server-1_IP = "138.68.163.245" -> null

Do you really want to destroy all resources?
  Terraform will destroy all your managed infrastructure, as shown above.
  There is no undo. Only 'yes' will be accepted to confirm.

  Enter a value:
Confirming with a yes will destroy all 3 resources.
Finally
This example shows how simple tasks like installing an Asterisk server and applying some basic access restrictions can be easily automated. You could have your development or test environment written as code, easy to bring up when you need it and tear down when you are done.
In the third and final part of this series, I will discuss some ways to better structure the working directory and discuss the benefit of splitting the script into multiple files.